 Pin
Pin I'll never forget the first time I saw a patchwork quilt cake at my grandmother's house—it was displayed like edible art on her kitchen counter, a burst of colors arranged in such perfect squares that I thought it must have taken a professional baker to create it. Years later, when she finally shared the secret with me, I realized it wasn't about fancy techniques at all, but about patience, a little food coloring, and the joy of building something beautiful layer by layer. Now whenever I make this cake, I'm transported back to her kitchen, flour dusting the apron she gave me, and the quiet satisfaction of watching colorful squares come together into something that looks far more complicated than it actually is.
I made this cake for my daughter's birthday party last summer, and watching the kids' faces light up when they saw it was pure magic. One little girl asked if it was okay to eat something so pretty, and that's when I knew this recipe had captured something special—it bridges the gap between art and comfort food in a way that feels almost magical.
Ingredients
- All-purpose flour (350 g): The foundation of your sponge—it needs to be measured carefully to keep the cake tender. I always spoon and level mine rather than scooping directly from the bag, which prevents the denseness that comes from too much flour.
- Granulated sugar (300 g): This sweetens the cake and creams with butter to create that light, fluffy structure. Don't skimp on the creaming step; those couple of minutes make all the difference between a dense cake and an airy one.
- Baking powder (2 ½ tsp): Your leavening agent—it's what gives the cake its tender crumb and helps each colored layer rise evenly. Make sure yours hasn't been sitting in your cupboard for three years like mine had once.
- Salt (½ tsp): Just a pinch, but it enhances the vanilla and balances the sweetness in a way you won't be able to identify but will definitely taste.
- Unsalted butter (250 g), softened: Room temperature butter is essential here—cold butter won't cream properly, and you'll end up with an inferior crumb. Take it out of the fridge 30 minutes before you start.
- Large eggs (4): These provide structure and moisture. Room temperature eggs integrate better into the batter, creating a more uniform texture across all your colored squares.
- Whole milk (250 ml): This keeps the cake moist and tender. The alternating addition of flour and milk creates an emulsion that traps moisture beautifully.
- Vanilla extract (2 tsp): Use real vanilla if you can—it adds a subtle warmth that gel food coloring doesn't mask.
- Food coloring gels (red, yellow, green, blue, purple): Gel colors are non-negotiable here. Liquid food coloring dilutes your batter and creates an uneven crumb. The gels give you those vibrant hues without compromising the cake's texture, and a tiny amount goes a long way.
- Unsalted butter for frosting (350 g), softened: This is your canvas for assembly. Softened butter whips to the right consistency for both gluing squares together and creating a smooth finish.
- Powdered sugar (500 g): Sifting this first prevents lumps in your buttercream. Trust me on this one.
- Milk for frosting (3–4 tbsp): Start with 3 tablespoons and add more gradually until your frosting reaches spreading consistency. The humidity in your kitchen will affect how much you need.
- Vanilla extract (2 tsp): Same quality consideration as the cake batter—real vanilla makes a difference.
- Salt (pinch): A tiny bit in the frosting prevents it from tasting one-dimensional and sweet.
Tired of Takeout? 🥡
Get 10 meals you can make faster than delivery arrives. Seriously.
One email. No spam. Unsubscribe anytime.
Instructions
- Set your stage:
- Preheat your oven to 180°C (350°F) and get those five square pans lined. If you don't have five pans, don't worry—baking in batches works fine; just keep track of which color is which. Grease the pans well and line them with parchment paper so your cakes release cleanly without sticking. This is one of those moments where preparation truly is everything.
- Create your base:
- In a large bowl, cream together the softened butter and granulated sugar. This should take about 3 minutes on medium speed until the mixture is pale, fluffy, and noticeably lighter in color. You're incorporating air into the butter, which is what gives your cake that tender crumb. Now beat in each egg one at a time, waiting for each one to fully incorporate before adding the next. Pour in the vanilla extract and mix until combined.
- Build the dry foundation:
- In a separate bowl, whisk together the flour, baking powder, and salt. This distributes the leavening agent evenly, preventing any pockets of bitter baking powder flavor. Take your time with this step even though it seems simple.
- Bring it together:
- Here's the technique that matters: alternate adding the flour mixture and milk to your wet ingredients, starting and ending with flour. This protects the gluten from overdevelopment and keeps your cake tender. Add about a third of the flour, then half the milk, then another third of flour, then the remaining milk, and finally the last of the flour. Mix on low speed just until combined—overmixing is the enemy here.
- Paint your batter:
- Divide your batter evenly into five bowls. A kitchen scale here is genuinely helpful, but eyeballing works too if you're careful. Now comes the fun part: add a small amount of food coloring gel to each bowl and stir gently until you have five vibrant colors. The gels are potent, so start small and add more if needed. You should have deep, rich colors without making the batter taste artificial.
- Fill and bake:
- Pour each colored batter into its prepared pan and smooth the surface evenly. Slide them all into the oven and set a timer for 20–25 minutes. The cake is done when a toothpick inserted into the center comes out clean or with just a few moist crumbs. Don't overbake—that's where dryness sneaks in.
- Cool with patience:
- Let the cakes cool in their pans for 10 minutes. This allows them to set slightly, making them sturdier for turning out. Then flip each one onto a wire rack and let them cool completely. This takes about an hour, but it's crucial—you cannot assemble with warm cake.
- Prepare your frosting:
- While the cakes cool, beat the softened butter until it's creamy and pale, about 2 minutes. Gradually add the powdered sugar a bit at a time, beating after each addition so you don't create a cloud of sugar in your kitchen. Once combined, add the vanilla and salt, then drizzle in the milk a tablespoon at a time until your frosting is spreadable but still holds its shape. It should feel like thick whipped cream.
- Cut your squares:
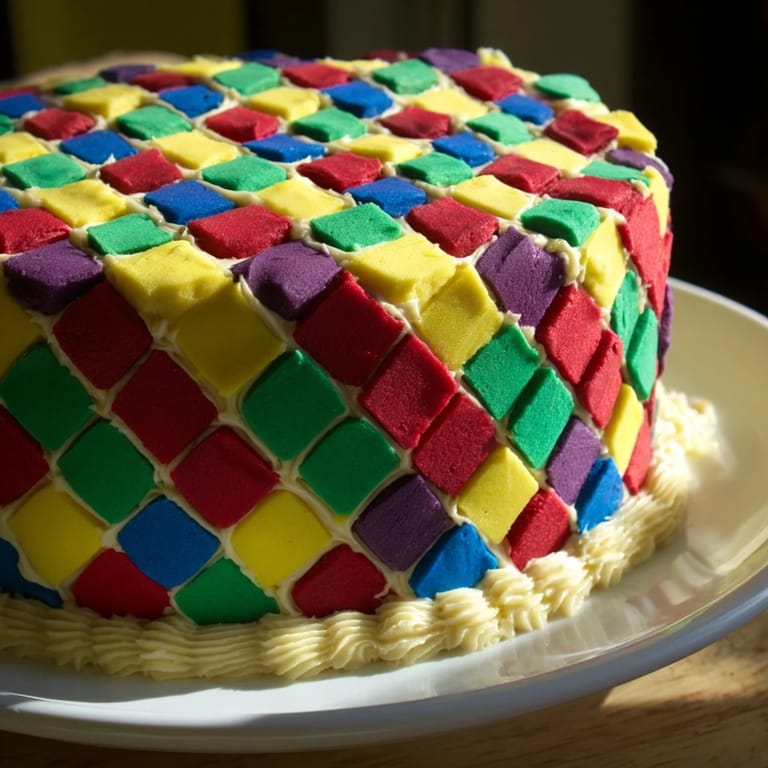
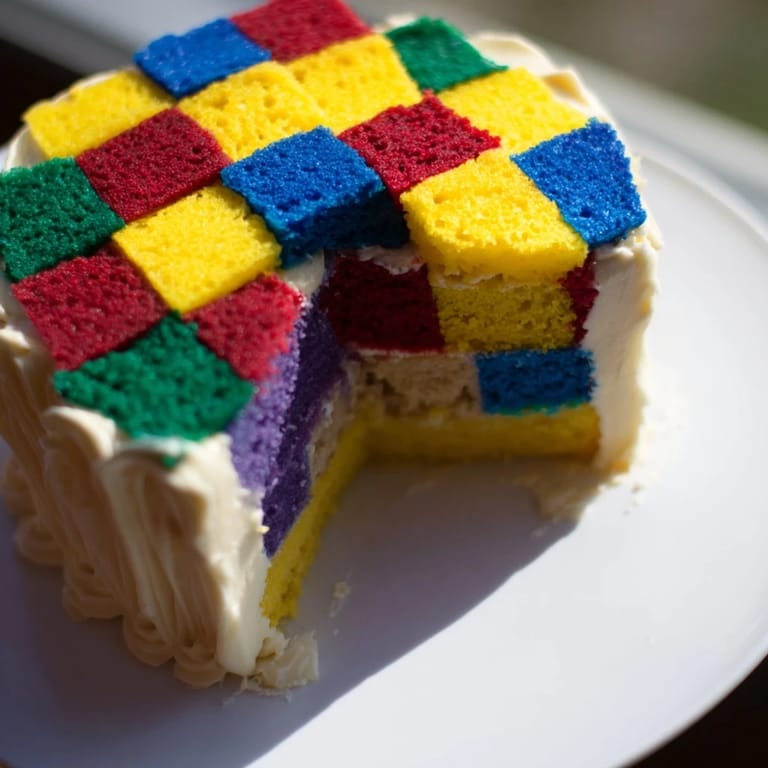
- Once the cakes are completely cool, trim the edges with a serrated knife to make clean sides. This isn't just for aesthetics—it makes cutting uniform squares much easier. Now slice each colored sponge into squares about 3 centimeters on each side. You can use a ruler and mark the cake with a knife before cutting if you want perfect squares. Take your time here; precise cutting makes assembly so much more satisfying.
- Assemble your quilt:
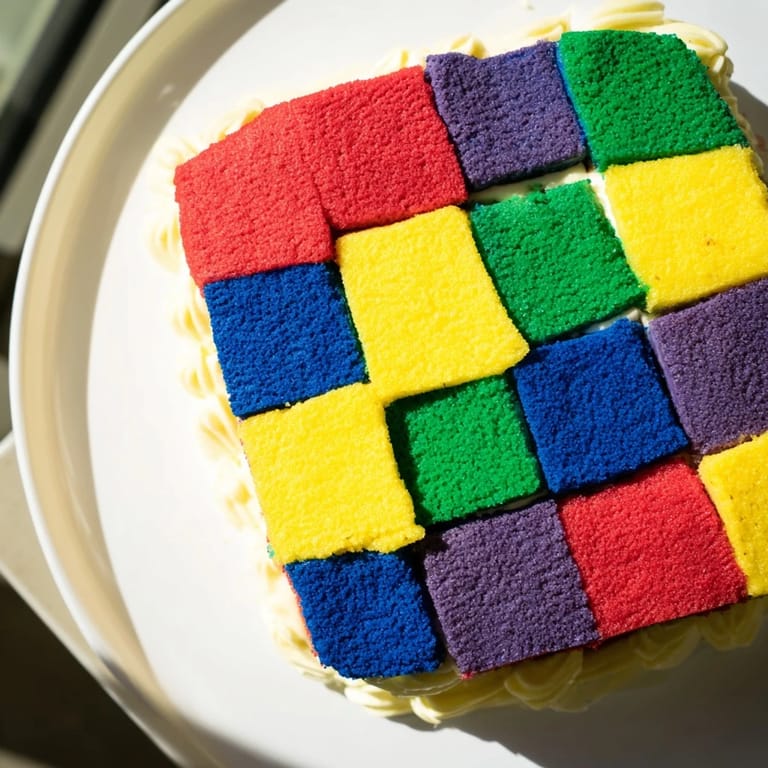
- On a large serving tray or cake board, begin arranging your squares in an alternating color pattern. Think of it like a real patchwork quilt—create a pattern that pleases your eye. Use a thin layer of buttercream between each square as a sort of edible glue, applying it with a small offset spatula or even a butter knife. Build your cake layer by layer, continuing the alternating color pattern vertically so that when you slice it, the inside reveals the patchwork too. This is meditative work, the kind of thing that makes you slow down and enjoy the process.
- Frost and finish:
- Once your assembled cake is stable, apply a thin crumb coat of buttercream over the top and sides. Chill this for 15 minutes, then add your final frosting layer, smoothing it as much or as little as you like. If you're feeling creative, use a piping bag to pipe buttercream lines that echo the patchwork pattern, highlighting the squares you've so carefully arranged.
- The final chill:
- Refrigerate the finished cake for at least 30 minutes before slicing. This sets the frosting and makes cutting cleaner. When you do slice into it and reveal the patchwork interior, it's worth every minute you invested.
 Pin
Pin The moment that truly cemented this recipe in my heart was when my mom saw the finished cake and simply went quiet. She circled around it slowly, studying the colors from every angle, and then looked at me with tears in her eyes because it reminded her of the quilts her mother used to make. That's when I understood that this cake isn't just dessert—it's edible nostalgia, a way of bringing textile traditions into the kitchen and making something meaningful.
Why This Cake Feels Like a Labor of Love
Yes, this cake requires more time and more pans than a typical layer cake, but there's something almost meditative about the assembly process. You're not stressed about precision or perfection—you're creating an intentional pattern, and each square you place is a small decision that builds into something bigger. It's the kind of baking that slows you down and reminds you why you love being in the kitchen in the first place. There's no rush here, no shortcuts that won't show. It's just you, five colors of cake, and the satisfaction of building something beautiful.
Customizing Your Patchwork
Once you've made this cake once, you'll start seeing infinite variations. You could use different cake flavors instead of vanilla—add citrus zest to one color, almond extract to another, a hint of cinnamon to a third. You could tint buttercream to match your cake colors, creating a frosting palette that's as intentional as the cake itself. Some people add different extracts to different colors for subtle flavor variations within each slice. The structure is your canvas; the flavors are entirely up to you.
The Architecture of Assembly
The beauty of this cake is that the assembled structure is stronger than you'd expect. The buttercream between the squares acts as both adhesive and cushion, and the cold temperature keeps everything stable during serving. I've transported these cakes to potlucks, birthday parties, and dinner events, and they hold up beautifully if you're gentle with them. Plan your pattern before you start assembling—whether you want a random patchwork, a stripe pattern, a checkerboard, or something more artistic. The pattern matters not just visually but structurally too, as it determines how the cake's weight distributes.
- Make a quick sketch of your pattern on paper before starting assembly to avoid decision paralysis mid-build.
- Keep your buttercream at the right consistency—too stiff and it won't spread easily, too soft and your squares will slide around.
- If a square breaks, don't despair. Use buttercream to hold the pieces together, and it won't show once frosted.
 Pin
Pin This cake is a reminder that the most showstopping desserts don't require exotic ingredients or complicated techniques—they just require intention and a willingness to take your time. Every time you serve it, you're sharing both cake and a little piece of artistry.
Recipe Q&A
- → How do I achieve vibrant sponge colors?
Use gel food coloring gels for vivid hues without altering batter consistency. Add to separate batter portions before baking.
- → What is the best way to slice the sponge cakes?
Trim edges and cut each colored sponge into uniform 3 x 3 cm squares for consistent layering and clean patchwork presentation.
- → How long should I chill the assembled cake?
Chill for at least 30 minutes to allow the buttercream to set and the layers to hold firmly together before serving.
- → Can the cake batter be adapted for dietary restrictions?
Yes, substitute all-purpose flour with a 1:1 gluten-free blend to make the cake gluten-free while maintaining texture.
- → What tools are essential for this cake assembly?
Electric mixer, square baking pans, spatula, serrated knife for precise cutting, and optionally a piping bag for decoration.