 Pin
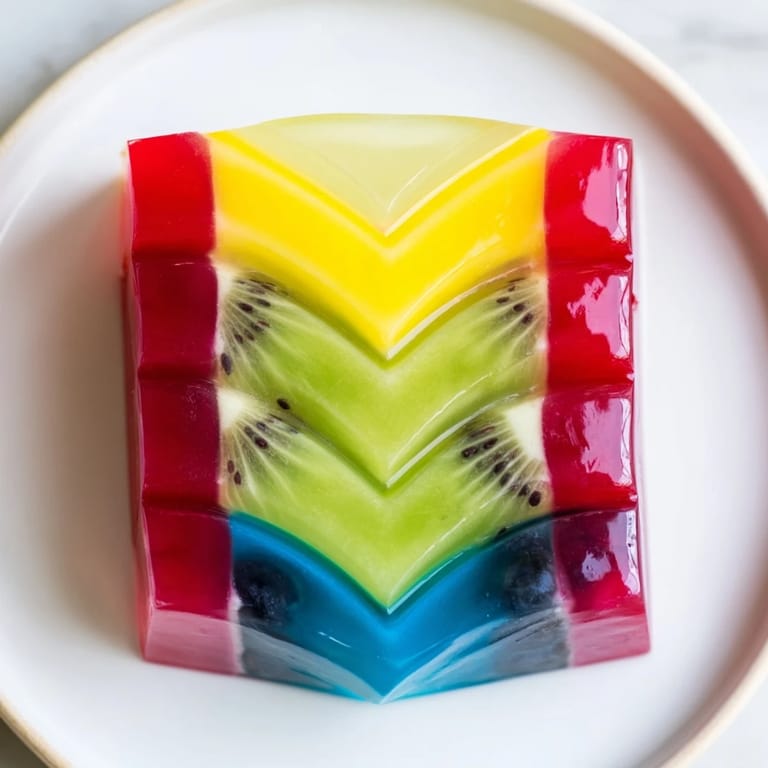
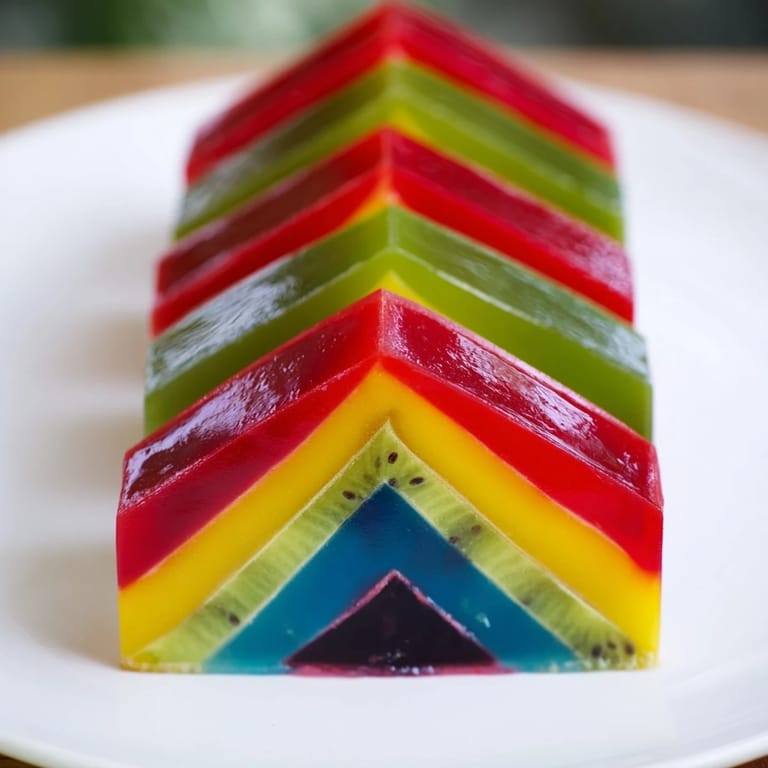
Pin The first time I made The Kaleidoscope, I was trying to impress someone who'd just told me they were bored with desserts. I stood in my kitchen, staring at five bottles of food coloring, thinking I'd either create something magical or a muddy mess. What emerged from the pan hours later stopped me mid-breath—those perfectly angled stripes of raspberry red, mango gold, kiwi green, blueberry violet, and blackberry deep purple seemed almost too pretty to slice. That moment of cutting into it and seeing the geometry actually work changed how I thought about what dessert could be.
I made this for a dinner party on an unreasonably hot summer evening when everyone arrived already melting. Setting it down on the table created this moment of silence—the kind where people actually stop talking to look at something. One guest asked if it was edible or just very elaborate decoration, and I've never felt more vindicated by a joke. By dessert time, the kitchen had cooled just enough that the gelatin held perfectly, and watching people try to describe the flavor combinations while smiling felt like the whole three hours of chilling was worth it.
Ingredients
- Whole milk and heavy cream: The backbone of the filling, they create that silky texture where you can actually taste the fruit without it being aggressively smooth.
- Granulated sugar: Just enough to balance the fruit purees without letting them get too tart.
- Powdered gelatin: The thing that makes the geometry possible; gel sheets work too if you prefer not to measure powder.
- Vanilla extract: A whisper of flavor that ties all five fruits together instead of letting them shout over each other.
- Food coloring: Gel colors are more concentrated than liquid, so start with less and add until it feels right to your eye.
- Fruit purees: The soul of this dessert; use whatever combinations call to you, but matching colors to flavors makes the presentation feel intentional.
- Digestive biscuits or graham crackers: The base that nobody remembers but everyone notices if it's missing.
- Unsalted butter: Just enough to bind everything without making it taste like you coated it in grease.
Tired of Takeout? 🥡
Get 10 meals you can make faster than delivery arrives. Seriously.
One email. No spam. Unsubscribe anytime.
Instructions
- Prepare the foundation:
- Crush your biscuits into fine crumbs and mix with the melted butter until it feels like damp sand. Press it firmly into the pan, really commit to it, and let it chill while you work on the layers. A cold base makes everything easier later.
- Bloom the gelatin:
- Sprinkle gelatin over cold water and let it sit for five minutes—this matters more than it sounds. Once it's soft and swollen, you're ready to dissolve it.
- Heat and dissolve:
- Warm the milk, cream, and sugar together over medium heat, stirring occasionally until the sugar is completely gone and the mixture is steaming but not boiling. Remove from heat, add the bloomed gelatin, and stir until it's totally dissolved and smooth. Add vanilla and mix.
- Divide and color:
- Split the mixture into five bowls and add a different fruit puree and matching food coloring to each one. Stir until the color is even and the fruit flavor is throughout.
- Create the V-segments:
- This is where the magic happens—arrange aluminum foil or cardboard dividers in your springform pan to create five V-shaped sections pointing to the center. Pour each colored mixture into its own section carefully. The dividers hold everything separate while it sets.
- First chill:
- Leave it undisturbed for thirty minutes until the gelatin is set but not completely solid. Then gently remove the dividers—they should come away cleanly, leaving the stripes perfectly in place.
- Release and slice:
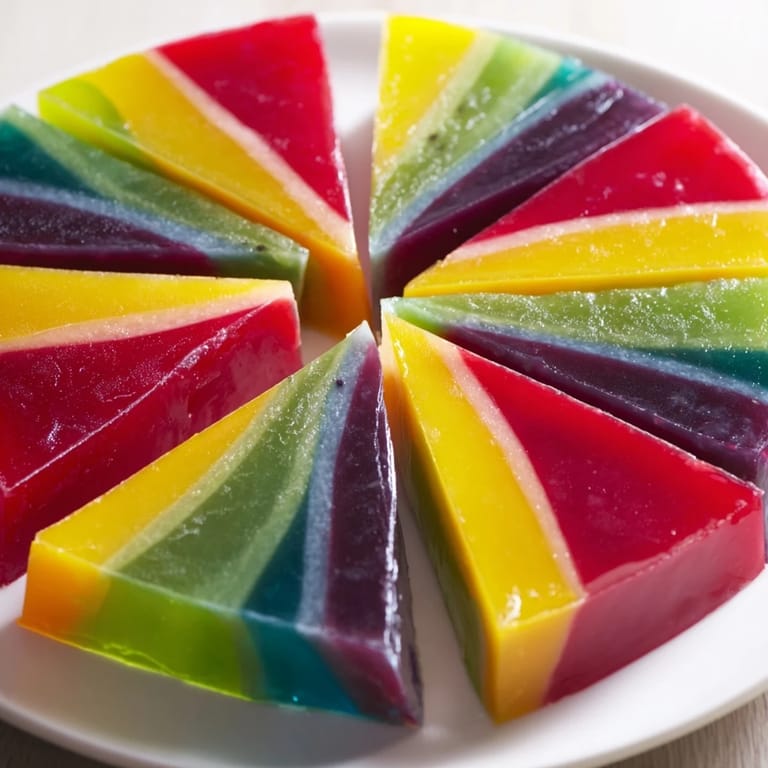
- Run a thin knife around the edge of the pan and carefully release the springform. Each slice will show all five colors radiating outward like a real kaleidoscope.
- Final chill:
- Give it at least two more hours in the fridge before serving. This final rest makes sure everything is perfectly set and the flavors have time to meld.
 Pin
Pin There's a moment when you pull the dividers away and see the stripes are actually perfect where something shifts from kitchen task to small achievement. I remember standing there with a spatula, looking at it under the kitchen light, and feeling genuinely proud of something I'd made with my hands. That feeling is worth the three hours of waiting.
The Art of Layering
The V-shaped segments are the whole point, and they work because geometry is honest. Each wedge is exactly the same angle, so when you slice through the center, you get perfect symmetry every time. I learned this after my first attempt with mismatched dividers, where some segments were twice the size of others and the whole effect fell apart. Now I measure the angles before I pour anything, and it saves the whole execution.
Flavor Combinations That Work
The five fruit colors I suggested are only suggestions—what matters is thinking about how the flavors actually taste together when someone eats a slice with all five at once. I've done versions with passion fruit, pomegranate, and white chocolate, and they work just as well as long as the flavors don't compete. Tart fruits balance sweet ones, bright flavors balance rich ones, and the vanilla in the base brings everything into harmony. The beauty of this dessert is that it looks complicated but tastes incredibly balanced if you choose your purees with intention.
Making It Your Own
After you've made this once, you realize you can customize it endlessly without losing what makes it special. Change the base to crushed cookies, use juice instead of puree for brighter colors, add a thin layer of chocolate in between if you want. The structure stays the same but the personality changes completely. I've made versions that look like sunsets, others that look like stained glass, depending on the fruit combinations and the mood I'm in.
- Vegan gelatin substitutes like agar-agar work beautifully if you use the same ratio and let it cool slightly longer.
- Serve it with something cold and creamy—whipped cream or vanilla ice cream turns it from impressive to absolutely unforgettable.
- Make it the day before if you're hosting; the flavors deepen and you get to enjoy your guests instead of staring at it.
 Pin
Pin This dessert teaches you something about patience and precision, but mostly it teaches you that taking time to make something beautiful for people stays in their memory long after they've finished eating. That's worth the three hours and forty minutes every single time.
Recipe Q&A
- → How do you create the V-shaped segments?
Use aluminum foil or cardboard dividers to partition the pan into five V-shaped sections, pouring each colored layer separately for defined segments.
- → What gelatin substitutes can be used for dietary preferences?
Agar-agar can replace gelatin for a vegan-friendly alternative, paired with coconut milk and cream for a similar texture.
- → Can different fruit purees be used?
Yes, you can customize the dessert with any preferred fruit purees and matching colors to create unique flavor and color combinations.
- → What is the purpose of chilling the layers?
Chilling sets each gelatin-infused layer firmly, allowing distinct colors and shapes to hold their form before assembling the full dessert.
- → What type of crust is recommended?
A base made from crushed digestive biscuits or graham crackers mixed with melted butter offers a crisp foundation balancing the creamy layers.
- → How long should the dessert rest before serving?
After assembling, chill the dessert at least two hours to ensure all layers are fully set and flavors meld before serving.