 Pin
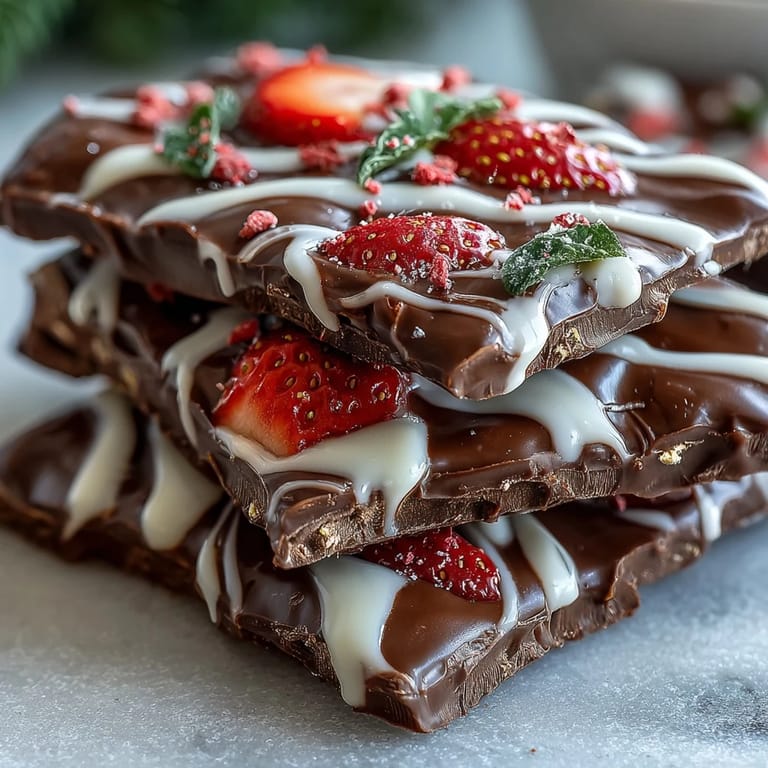
Pin There's something magical about the moment chocolate hits a cold marble slab and begins to set—that's when I knew bark would be my go-to Valentine's gift instead of another box of truffles. My kitchen smelled like cocoa butter and possibility, and I realized that the best gifts don't always require hours at the stove. This chocolate strawberry bark came together so easily that I made three batches just to keep one for myself. The combination of dark and white chocolate swirled together felt elegant enough for romance, yet simple enough that even my cooking-averse friend could make it. I've been making it every February ever since.
I'll never forget packaging these into small boxes tied with ribbon last year and handing them out to friends who were having rough weeks—the way their faces lit up when they opened them proved that homemade chocolate bark hits different than anything store-bought. One friend told me months later she'd kept the box on her desk because it made her smile on hard mornings. That's when I realized this recipe wasn't just dessert; it became a tiny edible love letter.
Ingredients
- Dark chocolate (200 g, 60–70% cocoa): This is your foundation, so choose something you'd actually eat on its own—the quality matters more than the quantity since there aren't many ingredients competing for attention.
- White chocolate (100 g): It melts faster than dark chocolate, which I learned the hard way after scorching my first batch, so keep a close eye on it and use shorter microwave bursts if that's your method.
- Freeze-dried strawberries (30 g): They stay wonderfully crisp and tangy, providing texture contrast that fresh berries simply can't achieve since they'd release moisture and turn soggy.
- Valentine-themed sprinkles (2 tbsp): These add visual joy and a hint of sweetness—use whatever colors make you happy, not what some food blogger says you should use.
- Chopped pistachios or almonds (1 tbsp, optional): The nuttiness is a lovely surprise against the chocolate, though you can skip them entirely if you're keeping it simple or managing allergies.
Tired of Takeout? 🥡
Get 10 meals you can make faster than delivery arrives. Seriously.
One email. No spam. Unsubscribe anytime.
Instructions
- Prepare your stage:
- Line your baking sheet with parchment paper so nothing sticks and cleanup becomes almost effortless. This single step prevents the kind of chocolate disaster that makes you want to order takeout instead.
- Melt the dark chocolate:
- Use a double boiler if you're cautious, or microwave in 30-second bursts if you're confident—either way, stir until it's completely smooth and glossy. You'll know it's ready when there are no little lumps hiding in the bottom of your bowl.
- Spread your chocolate foundation:
- Pour it onto your parchment and use a spatula to create a rectangle about 8x10 inches, working quickly before it sets. The thickness should be consistent enough to snap cleanly later but thick enough to feel indulgent.
- Melt and drizzle the white chocolate:
- Use the same melting method, keeping an even closer eye since white chocolate is more sensitive and can seize up faster than its dark cousin. Once melted, drizzle it over the dark chocolate in loose lines.
- Create the marble effect:
- Take a toothpick or the tip of a knife and drag it gently through the white chocolate lines to create swirls—don't overthink this part, even messy swirls look intentional and artistic. The imperfect ones always photograph better anyway.
- Add toppings while chocolate is still warm:
- Immediately scatter your freeze-dried strawberries, sprinkles, and nuts across the surface and press them gently so they stick as the chocolate sets. This timing is everything—wait too long and they'll slide right off.
- Chill until completely set:
- Give it 30 minutes in the refrigerator, or until the chocolate snaps cleanly when you test a corner with your finger. Impatience is the enemy here, so set a timer and actually wait.
- Break and serve:
- Once fully set, break it into irregular shards—they look more appealing than perfectly cut pieces anyway. Package or serve immediately, or store for up to a week if you have the willpower.
 Pin
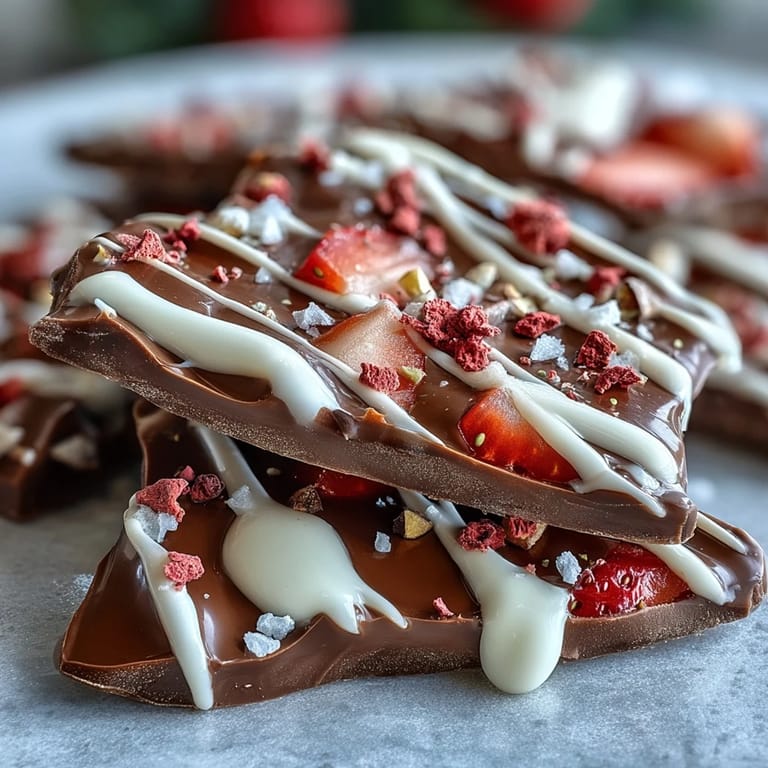
Pin There was this moment last Valentine's Day when my partner broke off a piece and the chocolate snapped perfectly while the strawberries released this subtle tartness that made them close their eyes for a second. That small, quiet moment of appreciation reminded me why I keep making this recipe—it's dessert that actually tastes like you cared enough to get the details right.
Customization Ideas That Actually Work
The beauty of bark is that it's forgiving and flexible—I've experimented with dried raspberries when strawberries weren't available, and they brought a deeper flavor that was equally wonderful. Coconut flakes add tropical flair, mini marshmallows create little pockets of sweetness, and even crushed pretzels have made appearances on my kitchen counter. The only real rule is that you should use toppings you actually want to eat, since there's nowhere for them to hide in such a simple dessert.
Melting Methods and Why They Matter
I've done this both ways, and honestly, the double boiler is safer but slower, while the microwave is faster but demands your attention because chocolate can go from melted to burned in what feels like a single second. The double boiler method is your friend if you're new to chocolate work or easily distracted—the gentle steam heat makes it nearly impossible to scorch anything. If you go the microwave route, those 30-second bursts aren't just a suggestion; they're the difference between silky chocolate and grainy disappointment.
Storage and Gifting Wisdom
Keep your finished bark in an airtight container in a cool spot, and it'll stay crisp and delicious for up to a week, though mine rarely makes it past day two. For gifting, I've learned that wrapping individual pieces in tissue paper and placing them in a small box feels more special than handing over a whole sheet, plus it protects the beautiful presentation you worked for. A simple handwritten note about the ingredients or a silly memory makes the gift feel personal in a way store-bought never could.
- Room temperature storage works fine as long as your house doesn't get too warm, so resist the urge to refrigerate after the initial set.
- Layer pieces between parchment paper in your storage container to prevent them from sticking together or breaking apart.
- If someone has a nut allergy, make a batch without the optional almonds or pistachios—the chocolate and strawberries stand perfectly well on their own.
 Pin
Pin This bark reminds me that the best gifts are often the ones made in haste with genuine ingredients and even more genuine love. Make it, break it, share it, and watch people's faces light up the way mine did the first time I tasted that strawberry-chocolate snap.
Recipe Q&A
- → What type of chocolate works best?
Use high-quality dark chocolate (60–70% cocoa) for a rich base. White chocolate adds sweetness and an elegant swirl.
- → Can I substitute toppings?
Yes, try dried raspberries, shredded coconut, or mini marshmallows for different textures and flavors.
- → How do I melt the chocolate properly?
Melt chocolate using a double boiler or microwave in short bursts, stirring until smooth to avoid burning.
- → Is this suitable for any dietary restrictions?
This treat is vegetarian and gluten-free if gluten-free chocolates and sprinkles are used. Check for nut allergies due to optional toppings.
- → How should I store the chocolate bark?
Store in an airtight container in a cool place for up to one week to maintain freshness and texture.